Sunday, November 15, 2009

AU 2009! Project Templates


Its the final run-up to AU2009. I know attendance is going to be down this year, but still looking forward to seeing old friends.

I'm teaching a course on Project Templates this year. I'm really interested in getting feedback from many users. I've had several conversations and calls with folks from around the world about project templates in an attempt to gather as many points of view as possible. But I'm not done!!! Even if you can't make it to AU this year, take the survey now!

Click Here to take survey

Results will be integrated into my presentation materials, which will be posted on the AU site. If you're a subscriber that means you can get the info. It also means that if they decide to record me, you'll be able to watch the whole thing.
 
Good Autodesk® Revit® Project Templates: Keys to Efficiency

I'm also running an UnConference session all about Project Templates:

What Makes a Good Autodesk® Revit® Project Template

Friday, October 30, 2009

Multiple Match Type

This little feature has escaped me for who knows how long, and I confess to finding it in 2009, and not 2010 (though I grabbed my screen shots from there). 2010's Ribbon also makes it far more obvious then in the old UI. But here it is. When you use Match Type (MA on the keyboard) in the options bar is a little check box option appears "Multiple". Check it, and you're dropped into a selection mode where it is very easy to select multiple objects whose Type you want to change to your "base" type. Click on the "Finish Selection" button and all the types change at once!


Thursday, October 22, 2009

Subscription Advantage Pack available

Sometime in the last 24 hours Autodesk posted the new Build, Revit Extensions, Model Review (aka BIM Review) and DB connect on the subscription website. Enjoy!

Tuesday, October 20, 2009

Follow-up from Revit Blogger Day

First, no, I'm not getting paid (though I keep hearing "the check is in the mail"....) ;-)

To dive into a little more detail Autodesk will be releasing the "Subscription Advantage Pack" essentially this wraps up things like "Revit Extensions" or the brand new "Wood Framing Utility" as well as including a special Revit build that includes new features for subscribers only. This new build and any new features will of course be compatible with non-subscribers, however those of us who work for companies that do subscribe will now get tools such as what was listed previously.

So what's coming, I think my previous list of new "features" was pretty self explanatory. What else is coming...

For Revit Arch & Structure there will be a new extension for wood framing. What this does, is it allows you to select you walls (yes walls only) and generate wood framing following various rules, you can adjust the framing in an editor. When you're done, push the magic button and you get wood 2x's modeled all over your model... pretty sweet (almost makes me want to do plain old residential construction).

The Revit DB link (which had previously been posted on Autodesk Labs (with a built in timebomb) will now be available.

"Model Review" this looks like Avatech's BIM Review, but more tightly integrated with Revit, I know there is a very close relationship there, so to say "I'm not suprsised" is not to much of an overstatement. Part of Autodesk's plug with the new Model Review extension is that it will allow you to validate a model is ready for energy anaylsis, and help to identify what needs to be fixed in order to get valid results.

There is a bunch of feature ports in the custom build. For instance; architects will be able to:

  • Create Sloped Columns
  • Create Curved Beams
  • Create complex Trusses
  • Cope beams
  • Create slabs with integrated metal decking profiles and slab direction
The "split wall with gap" tool has moved out of the realm of an INI mod, into a real feature. Autodesk can't say much about overall performance of this tool, other then that is has been in use for awhile. What is nice is that when used, it maintains the wall as a single object, even though it has been split. It seems like this tool has some useful possibilities, but I'm not totally sold, yet....

Structure is getting some improvements to the bridge tool. MEP is getting all new content particularly for electrical stuff besides Power & Lighting. MEP is also going to get tempory dimensions when in layout mode (which should prove useful).

You'll find other folks blogging about this new stuff, so be sure to see what I missed, or get their take.

More from ADSK blogger day...

Autodesk is releasing a "Subscription Advantage Pack" which will basically wrap a bunch of things that were released by themselves for subscription members, plus add new things like New Features.

Coming in a few days for all Revit products:
  • Shortcuts for draw commands
  • Keyboard shortcut manager
  • Conditional formatting
  • Text format shortcuts (cntrl+b, i & u)
  • Text Find & Replace
  • Convert lines (model/drafting)
  • Linked file performance improvements

Autodesk Revit blogger day!

On the Webex now, more "pre-release" info to come!

Friday, October 02, 2009

I'll take a double please....


A double skin that is!

I took a little more then a week, but I finally managed to build a working double skin panel. It still needs some refinements, but it at least works! While this may not be perfect for full on Consrtruction Documents (yet) I think this holds a lot of promise for some of the more practical things you can do with the new tools that showed up in Revit 2010.


Things I've learned (mostly from Zach):
  • Points - its all about locating points! Then creating geometry.
  • Workplanes!
  • Build everything off the corner points.
  • If not the corner points, then driving points on the default reference lines.
  • Did I mention workplanes? "Set" workplane should be your next favorite tool.
  • Dimensions need to be set to specific workplanes too.
  • Did I mention points are important? Make the reference planes of the points visible (properties).
  • Use the reference planes defined by reference lines.
  • The "host point by intersection" is a handy tool.
  • Did I mention points?
  • Workplanes.....

Wednesday, September 30, 2009

Invisible to be Visible?

This is what I would I consider to be an "old technique" but it has come up recently around the firm. How to make objects that are above the view's cut plane (in plan) visible (I suppose it might work in section/elevation, but I never tried).

If you've read the wonderful Revit series "Introduction to Revit Arch" & "Mastering Revit Arch" (both solid books, thanks to the authors, whom I've been meaning to blog about), you should already know that certain objects will show-up, even if they are above the cut plane of the view. All of the categories are categories that are "cut" in plan and it mostly has to do with architectural convention about showing some stuff in a plan, even if it is not "technically" visible in the plan.

So that works really great, for those categories. However, what if you have a light fixture (say a wall sconce) that you also want to show in your plan, but of course it is mounted at 5'-6" or 6'-0", what do you do! Even if you put in symbolic geometry it won't help, as the view is not cutting the object, or the object is not below the cut plane. One solution would be a plan region, but they can be wonky at best, and would you really want to do a plan region for every wall sconce...? Or meven worse, modify the cut plane for the whole view? More then one view ! What we really need, is way to convince Revit that it is "cutting" through the object, even when its not.

Enter the Invisible line, an unseen friend! Take your wall sconce family, and you'll note that among the various Line Types (really subcategories) available to you with which to draw lines is "". Now, simply draw a line from the reference level to your wall sconce geometry (you can do some align/locks if you so choose). Pop the family back into your project, and viola! You're sconce will show up in your plan, with no extra effort.

Now wait! You might say, what is going on. Quite simply Revit is obeying its own rules (kinda like Kirk in the Kobayashi Maru, but not really), while we can not "see" the invisible line, when Revit's view cuts through the line, its there, and it "sees" it, which means it sees the object. Since a light fixture is a "non-cuttable" category, that means Revit must render the fixture in projection, since this is a plan, that means to render the light fixture in projection would require that the "top" of the fixture be shown in the view. Therefore, the light fixture is displayed in plan the way you want it to, all because of a simple invisible line.


I've not done an exhaustive review, but I beleive invisible lines are only availble in families that belong to categories that do not cut (which would make sense), I'm also not sure if the line style shows up if you make a family first with a generic template, then change the category. I'll leave it up to you the reader to explore and learn on your own. I do know it works for light fixtures and speciality equipment (the two I deal with most often, and where the issue is most likely to crop up).

Friday, September 25, 2009

Classic Roman Architecture anyone...?

This started as a little "show & tell" to Zach, and now its a movie... (mine didn't work nearly as well as his).

I think this goes further to suggust what you can do with these tools to handle complex geometry we just could not model before. Easy? No! Cool? Yes!

Further disclaimer - Zach made the video, not me. I just got the conversation started..... (my panel didn't work nearly as well as his)

Thursday, September 24, 2009

When E is not... E?

I was working on a family here at the company, and it turned out we need to use a formula that involved using a Log function (you remember Calculus right? Cause I don't.....). In excel the Natural Log (that is the log taken of e, your handy dandy mathematical constant) is notated with the function ln(). Which is fine and dandy. If you look in Revit help under valid syntax, is conveniently says that the "log" can be taken of any number, what they fail to mention is the base the Revit log function operates in, which is 10, not e (bummer :( )

But....! If you do enough research (or remember enough Calculus) you find out that Logs in base 10, can be converted to Logs in another base, by some simple alegabra. (hooray!) Even better, Revit help clearly states that the function exp() will raise e to the specified power, so therefore we could write:

= log()/log(exp(1))

and we would get the result we need, since a number raised to the power of 1, will simply be the original number. This is good, because theoretically this means that Revit (and or your computer) will use e calculated to the most accurate value the program (Revit) will accept (you're still with me, right?).

Yet, for some reason, Revit's result did not agree with Excel . With a little more help from some friends (read the whole AUGI thread here) it was discovered that the function exp() resulted not in raising e to the specified power, but 10!!! So, exp(1) = 10 in Revit, contradicting Revit's own help documenation!

Now I ask, why would we ever need a function that raises 10 to a power? I can always write: 10^2, 10^2..... I can even use parameters for both values if I need to, 10 is a number, not too hard to deal with. I would much rather have access to e particularly since I need it!

For now, we're using a truncated value for e in our formula, and its close enough, but I would say, with relative certainty that somewhere (quite a long time ago) someone made a mistake...

Not that too many people are running around using Logs and e in their Revit formulas, but with the advent of the new massing tools, it could become a possibilty. Besides, its the principal of the matter, right, we should have access to our standard mathematical functions, and the documentation should be correct!

Tuesday, September 22, 2009

Streaming Revit!?

Autodesk Labs has come out with something new and interesting. The ability to test drive and stream apps from their servers:

Project Twitch

This is really interesting to me, as it means that potentially we could do something very similiar internally, or, eventually, like many "cloud computing" applications, we need only pay for how much access we require to applications like Revit, Maya, Autocad, and our IT deptartment does not have to worry about maintaing the high powered comptuers or software.

Now, I realize that likely in the short to medium term server side apps will not replace the functionality of having something like Revit or Maya local on your computer, however, with a decreasing need for 2D Autocad, I could see high value in being able to "buy direct" from Autodesk, how much, and when we need access.

Wednesday, September 16, 2009

The future really is coming...

Steve Stafford recently had a really good post about "the future" here is another.

Indiana University has released BIM standards for project delivery, to be followed by BIM contracts. They cite a number of sources I'm familiar with, including the State of Wisconsin, which has also released BIM standards.

These standards are real, and they're detailed. Generally I don't take much issue with them, and most of them assume you're working Revit. However, I did note in IU's standards they require all wall finishes and materials to be included... paint anyone? It will be interesting to see how all this plays out. I have to assume that any of these organizations are willing to negotiate once you get to the table, since most of them require some sort of "plan" with regards to how the design team and contractors will work together, and the required model deliverables.

Tuesday, September 15, 2009

WE'VE MOVED!


We apologize for the lack of posting recently. For those who don't know .... you guessed it ......

WE MOVED!

Some of you who come to Boston RUG meetings will know this but we've moved to Boston!

And in case you didn't know this is Robert's wife Krista posting because I got tired of waiting for him to "get around to it". Thanks for the patience and we hope to get back to our regularly scheduled Revit posting soon.

Tuesday, July 14, 2009

An eye into the future.

I'm a little slow on the blogging here, but very excited to see this new tool released at Autodesk Labs: Revit Solar Radiation Tool

This is the kind of melding of design and anaylsis tools I've been waiting to see for a long time, just waiting to give it a try here. Note you need to update your Revit 2010 install with the latest service pack according to the info on their page.

In other news, I should mention that AUGI: AEC Edge, the new quarterly magazine focused on technology in the Design and Construction industry is out, and I'm in it, along with many other fabulous authors, give it a read when you get a chance.

Friday, June 19, 2009

AU classes

I'm happy to report that my two courses on Project Templates (an UnConference Session and a 90 minute class) were accepted for AU 2009. Assuming everything is scheduled properly the "conclusions" of the Unconference discussion will be incorporated into the 90 minute class (should make handouts a challenge ;) ). If people have thoughts on what makes a good (or bad) Project Templates, feel free to either comment or drop me a line via e-mail. I'm also looking forward to a good discussion at the UnConference session.

edit: Thanks to everyone and anyone who voted for my sessions.

Cheers,
-R

Wednesday, June 17, 2009

Fun with Rigs


Fun with Rigs thanks to Zach's latest post. I don't know what it is, but it was fun to build, and it doesn't break!

Sunday, June 07, 2009

Are you a contractor, looking for work?

So if you follow this blog at all, you know we are planning and designing a new home for ourselves to be built in southeastern Massachusetts (AKA the South Shore).

The house design uses SIPs for the exterior walls and we've been working very closely with a company located in New Hampshire who will be providing our exterior walls, roof(s) and floor system(s). We're still not sure what the foundation will be (we've looked closely at ICF's).

There is a great deal of interesting information out and about these days with regards to how a house can be "pre-fabricated" but not in the terms of building giant pieces of house that get shipped down the highway. One might call this a "hybrid" approach to prefabrication (don't miss a very good rebuttle). Some of this information is old news, but I've found it useful.

To get to the point, we're preparing to do an RFP process for GC's to help us build our house. We're looking for smart, intelligent partners, both at the GC level and the subcontractors who will work for them to build our house cost effectively, and intelligently, to help save some money and help save our environment.

Think you're qualified (or know someone who is), interested in doing business in a new way, up for a challenge? Then get in touch!

Sunday, May 10, 2009

Article of Interest

I'm not usually a big fan of the Architecture critic our local rag here in Philly, but for once she has a decent article: Changing Skyline: Building a McMini

Interestingly they're using SIPS, which is what we intend for our house (see previous post). Now I realize that prices don't scale linearly, but given their cost (around $100,000, not including land, etc.) I'm hopeful that we will be able to bring our house in at a reasonably price point too (do the math and they're somewhere around $100/sq ft).

Friday, May 08, 2009

House Renderings

Thanks to some tips from Buildz I've generated these recent renderings of our house design, doesn't it look warm and welcoming!


Also ran this interior rendering awhile ago:

Thursday, May 07, 2009

2010 Graphic Error

This may just be my machine but when I switch scales I get the following image until I hover over the button with my mouse.


-K-


Edit: This happens with both hardware acceleration turned on and off.

Days of Our Revit (the software serial soap opera)

So just in case you've been hiding under a rock somewhere...

If you didn't know it, as a Revit user you are a supporting character in what has become a bit of a melodramatic soap opera. I've pretty much stayed out of the Revit 2010 debate for a variety of reasons, most of which I'll be happy to discuss in person, but not here.

However in case you didn't know, there is a bit of a raging debate that has hit new highs in the last few days. To catch up, you merely need to keep abreast of the following sites:

the main character

the brash, devilishly handsome male lead

the overprotective parents

the younger child, with an independent streak

the introspective old man

and lastly, you the supporting cast....

I never liked soap operas, and still don't. There are very valid opinions and thought out there, on both sides of the "issues". Some people might stir the pot a little more then others, but it seems foolish to not address the issues head on and in a civil, reasonable way. Action, reaction, and re-reaction are neither.

There are more links out there, and more blogs, this was just a sampling of what I tend to keep my eye on.

Tuesday, May 05, 2009

Batch Render for Revit....

Friend of mine has posted this handy script (modified journal file) for doing batch rendering out of Revit. "Set it and forget it" to process multiple views over the weekend on your powerhouse machine at work. One note, while testing found out that you need to have your project browser set to the default that comes standard in the ADSK project template. I see this as particularly useful for doing more in depth sun studies. I was recently wanting to do every 5 mins for about 2 hours for an interior room on our house design. Currently you can only do a minimum of 15 minutes over a 24 hour period. Using this script, you would have to set-up views for each moment in time, but would give you far more control. Think of it as "stop motion animation" for Revit... :) You could even animate doors and other stuff!

http://buildz.blogspot.com

Vote for AU

Vote for AU courses.

Robert Manna's Courses:
Good Revit Project Templates
Finding Value in Revit When You're Not Doing IPD
What makes a Good Project Template - Unplugged

Krista Manna's Courses:
Revit in Living Color
The Standardization of Revit: Are you stifling your firm's creativity - Unplugged

And last but not least our joint venture:

Residential IPD: How to use Revit with Pre-fabricated Structural Insulated Panels (SIPs)

Please feel free to vote for our courses. We're both very excited about these courses and look forward to teaching them.

Wednesday, April 29, 2009

Submit AU Courses

Don't forget that AU courses are due this week. That includes Un-plugged sessions.

AU Courses


-K-

Tuesday, April 28, 2009

Revit Apps

Handy Revit apps a colleague of mine collected on his blog.

STC is the way of the dinosaur

In response to Steve Staffords Blog post:

STC is no more. Now it's SWC. To me this is harder to say and awkward. I think I may just stick with saying "sync" from now but am saddened by the loss of the revit language. STC was one of those phrases that you knew you were part of an exclusive club being a "reviteer". Say the password and you get to join our club. Oh well. Autodesk obviously thought it was confusing to users. "Syncronizing" is more appropriate to what you are actually doing.

-K-

Friday, April 24, 2009

Electrical Families 2009 vs. 2010 Comparison

Recently I've been working on a project that required a ton of electrical families. Now before all the engineers out there have a fit, We're doing an interior fit out where we are showing the locations of all the power devices. The MEP engineers are not in Revit so we're have to do this coordinating ourselves.

Because of this I was called upon to create a ton of electrical content for us poor architects and interior designers to use in 2009 mind you. So I open new electrical family and go to town. Only to find out my annotation family I have loaded in doesn't maintain it's orientation. So I go to the "Category and Parameters" to see what I can find:

...... Nothing Useful ......


MEP has this option why don't I?

So with getting 2010 "officially" installed (aka not beta anymore) I figured I'd check out what I get in that.


I can see it .... but I can't check it.


Seriously, what the use is that going to do me? I would rather you had left it not visible at all. That way I could live in ignorant bliss.

The one good thing that has now been added is that I can place MEP connectors in Arch. This option is now available when you create a new electrical family.


While this is useful, I'd also like to be able to maintain the orientation of my annotations. Oh, Revit. Why do you tease me so?

-K-

Thursday, March 05, 2009

Metamorphic Tag

I have a tag that when I zoom in on it, it seems to change the angle of the symbol once you get past a certain zoom level. Didn't know my tags were shape shifters. :-) Maybe I should just call this tag Odo. (I'm really showing how much of a geek I am and if you know what I'm talking about so are you!)


-K-

Wednesday, March 04, 2009

Missing Room Tag

This morning I had a teammate come to me and ask why a room was not showing up on her plan. I jumped in to investigate. Here are the parameters of the issue:

-Room & Tag could be placed on a ceiling plan
-Room & Tag could not be placed on Floor plan (received the check your visibility graphics error message)
-Room has all the same parameters as the rooms next to it (workset, height, etc.)

Q: Why would this room tag not show while all the others would?

A: Plan region.

A plan region had been placed in one location of this room to show the clerestory that was above the cut plane. The plan region was bigger then the wall thickness so cut into the space the room was in and was preventing the room from being visible. I don't fully understand why the plan region would do this considering the height the plan region was taken at would also cut through the room. I know of plenty of errors that plan regions seem to cause such as hatches in walls suddenly showing up as the wrong hatch because it has a plan region in one area of the wall. And there are plenty more. Just as a forewarning be careful where & when you use these. It may cause you more grief then it's worth.

-K-

Monday, February 23, 2009

RE: Link, The quest continues ....

Just a quick note about rendering with linked models.

In order for your linked model to render properly you need to :

A) make sure your model is linked to the current construction phase or your view is set to show complete. Otherwise everything in the linked model will render as grey.

B) Any custom material you create & assign to your geometry in the linked file needs to also be created in the file you are rendering from. They absolutely need to be called the same thing otherwise you get the following (unless you want to have red & black checker board wall finishes):


-K-

Thursday, February 12, 2009

Link & the quest for the princess


Ever get this message? The real problem? Well when you get this message it means that you have files that have been linked into that linked revit file that can no longer be loaded into the project. This reinforces my belief in limiting the number of cad files linked into a project to one or none. The solution to solve this message is simple: unlink or relink any & all cad files in the linked revit file.

-K-

Thursday, December 11, 2008

And now there are two: Part 1

In the beginning there was only Robert blogging. Now there are two.

Finally, after a long week at AU and pushing for a deadline as soon as I got back, I get to post my first post on this blog.

As some avid readers of this blog (and people I met at AU) already know Robert is my husband. So because most of you know his story let me first start off by telling you a little about myself.

I grew up in Albany, NY. I met Robert while attending RPI in Troy, NY. Came to work in Philadelphia, seeing as I wanted to actually live with my husband and he graduated first so I had no choice of location. I started working for a small 5 person residential firm in the area. After about a year I decided that I wanted to work on larger projects so I started working for Burt Hill with Robert. My first two weeks there I was thrown onto their first Revit project 2 weeks before CD’s were due. Talk about sink or swim strategy. :-) I fell in love with the program and have been an avid “evangelist” ever since. I now work for NELSON, a 500 person mostly interiors firm implementing Revit. Currently, we have two projects in Revit (well we’re back to one now that my deadline is over). The ongoing project is a 200,000 s.f. ground up project where we are doing the interiors only.

Now that I got that out of the way now on the more interesting topics: AU Unplugged. I really enjoyed my first speaking engagement at AU this year. It was a little nerve racking seeing as I’m not the best public speaker (thus why I’ve been staying out of the limelight thus far). But for some reason when I got that Unplugged email I felt compelled to submit.

It was really interesting to hear the debate about how much people model vs. don’t model. Some people were under the category of modeling everything save you time. Others were under the modeling everything makes the files too big. Both are very valid points. As far as me, I fall somewhere in between. If I’m going to cut a ton of sections through stuff or I’m going to render something, I tend to model it. But for other stuff, such as public bathrooms, nobody cares if they see the toilets in 3d. I mean unless you’ve designed some really hot looking bathroom, you’re not going to need to render it. By the way, I was on a project where we did end up rendering the bathrooms to show the client.

TO BE CONTINUED ....

-Krista-

Monday, December 01, 2008

Design Symposium (afternoon)


For those in the UK or designing for temperate climates, check out www.carbonbuzz.org. You can upload data anonymously, or let people know who you are, you can also benchmark against published standards. Either way, it helps you determine how you're doing on carbon use for a building. The trick is account for this type of information as you design (which is where the computation part comes in).

Earlier in the morning saw some interesting real examples of active facade elements designed by Hoberman Associates (Chuck Hoberman).

AU 2008 - Computational Design Symposium


So, Krista and I arrived yesterday. We're now attending the inaugural "Design Computation Symposium" hosted by Robert Aish. So far we have had a a fascinating presentation by Neil Katz of SOM, showing examples of 20 years of "Computational Design" work and application to a variety of scales from skyscrapers to interior "transparent" walls made of metal or corian.

After that we've seen some hints of what is coming in Revit Structure and Robot (Structural Anaylsis) to help Architects work with engineers to better understand how to derive efficient, elegant structures to support our building designs. By using analysis and permutation to understand various possibilities meeting different criteria.

Most recently we just saw a great "demo/review" of Ecotect by Dr. Andrew Marsh and the possibilities of scripting with Ecotect to generate "realtime" parametric anaylsis to understand the impact of passive sustianable design strategies on one's building design.

So far, an eventful and interesting morning, with more to come.

Monday, November 24, 2008

Andersen Windows

Anyone who has been around Revit for awhile knows that a long time ago Andersen Window and door came out with some families that impossibly complex and overbearing. So, since we're modeling/designing our own house, and we want Andersen Windows and Doors, I broke down and built some for myself. I've loaded them up on Revit city, you'll find single, double and triple casements & awnings (which share the same basic details). I followed the 200 series, but that generally matches the 400 series too. I did type catalogs for the casements. They all use a "core" casement or awning family that is shared nested. The cores are built with simple sweeps based on simplified Andersen details, so feel free to make more detailed if you desire. You'll also find simple interior and exterior trim that you can easily modify if you want. Find them here.

Happy Thanksgiving, and see you at AU!
-R

Wednesday, November 19, 2008

AU 2008 UnConference


If you follow the AU blog you know the UnConference Schedule has been released. This is the second annual UnConference at AU and for a second year in a row I will be running a session. You can also find out more information here.

My session this year is entitled: Size Doesn't Matter: A Discussion on Strategies for Complex Revit Projects Large and Small

So what would I like to see this discussion all about? In the last four years of working with Revit, I've come to realize that any number of conditions—such as multiple design firms, Integrated Project Delivery, multiple 3D models, phasing or early bid packages—can transform a straightforward design job into a knotty Revit problem. In that time I've discussed, observed and participated in several projects exploring a variety of techniques to address these issues.

This session is meant to be an active conversation by the attendees about their experiences and expertise. This will allow a broader and more detailed discussion of what works, what doesn’t, and when and where various strategies are appropriate. I'm expecting participants to use example project and conditions from their experiences to focus on Revit techniques, which may be influenced by hardware considerations but are fundamentally about selecting approaches when working in Revit. Be prepared to actively participate if you come.

My wife Krista will also be running her own UnConfernece session: Pros & Cons of 3D
Modeling vs. 2d Detailing in Revit

Hope to see you there.

Friday, November 14, 2008

A new favorite software & toy


Awhile back I bought myself a small little Bamboo tablet from Wacom. For those more familiar with the larger versions, this little $70 toy, is nice, it slips in my laptop bag effortlessly, and only requires a USB cable (no wall wart!). I can use it on my lap or at a desk without a problem.

The problem was, outside of Photoshop, I didn't have any good software to use it with, my laptop doesn't have TabletPC Edition on it, and most other programs (even sketch-up) are not really tablet friendly. You may recall I talked about Moi awhile back, adn while it is built for tablet use, I never have gotten into it, and I don't really need a modeling program like that at this time.

What I was originally hoping for when buying the tablet, was the ability to do some sketching, either on digital printouts (like PDF's), image files or freehand. Enter Autodesk, this summer they showed us a cheap little program called "Sketchbook Pro".

Sketchbok Pro is a nice little sketching program. Nothing fancy really, Autodesk says they benchmark against Photoshop as they develop Sketchbook. What is extremely nice is that its built for use with a tablet and stylus. The interface requires no right clicking and the gestures to manage the interface are tablet friendly. I've been using it primarily at the moment to work on our house, while we have a beautiful Revit model, it is often nice to sketch out ideas (check out the screenshot).

Monday, November 10, 2008

CSI Revit (Part III): Recreating a "crime"

We've discussed how to read journals, and how to use them to track down problems. Journals can also be used to recreate and create. Complex journal files built over a full working session perhaps don't work so well, but journal files created for specific purpose can be useful. For instance, Ken Stowe from Autodesk has in the past created journal files that can be used to sequence a Revit model using multiple phases to generate still frames of a Revit model being assembled. Journal files can be used to repeat tasks. Code can also be inserted into journal files to make changes or make things happen.

One useful thing you can do is insert code to create timers. Creating timers in a journal file allows us to test how long Revit takes to perform certain operations. So, we can create a journal file with specific tasks and operations that we plan to time. When creating a journal file to use for whatever purposes you need to be very specific about the tasks you do. In order to make it easier to read/edit the journal, excessive view manipulation, and "errors" should be avoided. Rather the specific tasks should carried out with the least possible mouse movement (shortcuts help). Once you've written your journal file, it is much easier to edit it if it has been cleaned (see the end of this post). When "writing" a journal file it is important that you always have the original file available that you start with, otherwise the journal will not run correctly. Another note, it is possible to save when creating a journal file, however when running the journal it must be able to exactly replicate the saving conditions. Writing journals with Workshared files also creates some difficulties, your best bet is to work with a detached copy, and not save.

With the clean journal file to create timers some basic code needs to be inserted at the beginning, after the line that contains "username":

Set fso = CreateObject("Scripting.FileSystemObject") 'create external file object
Set outf = fso.OpenTextFile("c:\My Temp\Journal Results\TimeResults.txt", 2, True) 'insert path for results file

Dim sTime,eTime,comment 'initialize variables

The first line starts the process, the second line "Set out f..." establishes where the results from the timers will be saved, and the last line "Dim..." sets the variables for the timers. After that, it is only a matter of actually creating the timers themselves.

Each timer is broke into a start and end. The end code looks like this (remember any line that starts with ( ' ) is a comment):

'stop timer code eTime = DateDiff("s", sTime, Time) 'put this at end of sequence to be timed. outf.WriteLine eTime & " Seconds of Elapsed Time for:" & comment 'end of code

I usually start with the end code, as you may recall it is easier to find "transaction complete" then the start. Once I have my end code in, I look for the start of the operation I want to time, and then I add the start code that looks like this:
'start timer code sTime = Time 'put this at start of sequence to be timed. comment = "Test Sequence Blah Blah" 'comment to specify what we are timing. 'stuff to time here

With the start code, its important to note that you need to add a comment to describe or name the timer where it says: comment = "Test Sequence Blah Blah"

A finished journal timer should look something like the image to the right.

Once you're code is inserted, you should be all set to run the journal. To run the journal, you will want to drag and drop the Journal file onto the Revit.exe icon located under ..\Program Files\Revit flavor\Program

At Burt Hill we've developed a utility that takes care of running journal files automatically, and repeatedly, so that we can gather multiple instances of results from the same machine running the same test. This allows for a better statistical comparison of machine performance from machine to machine, and makes it easier to run the same journal. We've also modified the code a little bit so that multiple results are appended to a single results file. With the code above, the results file is overwritten everytime the journal is run.

If you're interested, pop over to this AUGI thread. You'll find our benchmarker utility, and a couple of journal and revit files available for testing your machine(s). We've also tested using project files, however simply due to size, I can't release those. You'll also find a utility for cleaning the journal files, to make them easier to read.

Wednesday, November 05, 2008

CSI Revit (Part II): Tracking down the culprit

We left with how to read journal files, and a suggestion on practicing reading them. Today, we're going to talk about where and how they can come in use for some computer forensic detective work.

Allow me to set the scene.
  • At Burt Hill we encourage and keep multiple local files when working on a workshare project. This has come in use multiple times, and for multiple reasons. We usually suggest that a user maintain a week's worth, and sequentially overwrite the files.
  • A project team has been working diligently to their deadline. Annotating views, drawing details, setting up sheets, running check prints.
  • They're busy working the weekend, 12 hour days to meet their Monday evening print deadline.
Sometime late Sunday or Monday morning, someone realizes all the Keynotes are missing from all the views. The team knew they had been there as they had previous copies (digital & physical) of views/sheets that were complete.

The first step, was to figure out what could be done in the short term to deal with the problem. This is where our rule about multiple local files came in handy the first time. Team members were able to immediately start rescuing views by opening old local files and copying/pasting the missing Keynote Tags from old to current.

The next step was to figure out what happened to the Keynote tags, needless to user error was the primary suspect, but, whose error, and when? How many times have we all worked on large Revit projects, and had something "go missing" or something was "deleted" and we are left to wonder, what, who, when, how... Well one of our top users decided to track down what happened.

To start, he looked through the local files, local file history, and central file history to narrow down when the keynotes disappeared. For those who don't know, for both central and local files you can pull the save history from the File menu (see screenshot).

Once he had an idea of where to look more specifically is where the journal files became useful. With some sense of the approximate time to look for, our investigator used the find command to look for keynotes. What he eventually found was this in a journal file...

One of the users on the project had used "Select All Instances" of the keynote family used in the project, and hit "delete". For some reason this user was under the impression that "Select All Instances" was valid only for the active view! As it was, the user was helping our investigator, and was the one to find the four pages of text showing every keynote being selected, it was quite the teaching moment for the whole team.

While it took the lead investigator a good chunk of his day to sort through all the related files. It was needless to say quite useful to determine what had happened, most importantly, to help assure it doesn't happen again. While the copies of files, and back-ups helped with restoring the missing work, and helped to narrow down the time period in which the mistake happened, without the user's journal file there would have been no way to so clearly identify the culprit.

Check back at the end of this week (or beginning of next), for the my wrap up on journal files.

Sunday, November 02, 2008

CSI Revit (Part I): How to read the crime scene.

Do you know what a journal file is? If you have dealt with Autodesk support on an extended issue you may have been asked to submit journal files, but you may still not quite know what they are.

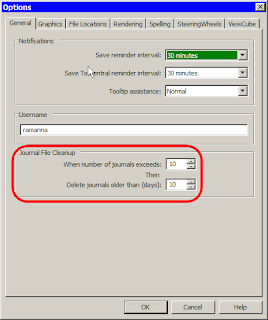
Quite simply journal files record all your actions during a Revit session, Revit creates a new journal file whenever you start it, and stops writing when you close it. Under the general tab of the options dialog [Settings menu >> Options] are two choices for how many and for how long you keep journal files. Revit always writes its journal files to the same location; Windows XP c:\Program Files\Revit version\Journals. I would assume that Vista installs maintain a similar structure/relationship. Journals are simple text files (in fact their extension is .txt) and can easily be opened with a program like "Notepad" (my preferred editor for such things). They are always named in the same format "journal.xxxx.txt", where the x's are four digit sequence.

Journal files are pretty interesting things, and can prove handy, particularly when troubleshooting. The reason Autodesk or Revit support likes to get their hands on journal files is because it gives them a window into what the user is/was doing, how the file is behaving, and how the computer is performing. Journal files not only record the user's interactions with the Revit file, but they also record vital computer statistics like how much memory is available, the video card installed, etc; all of which is useful when troubleshooting a problem.

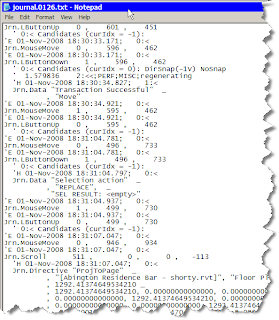
The particularly nice thing about journal files is they can also be "read" by a human. While there is some esoteric code that shows up, it is actually generally possible to read a journal file and understand the actions a user is/was taking. Of course we're not talking about reading a good novel, but as you become more familiar with them, you start to understand the pattern of the language, and thus how to read it. Most commands are listed with simple descriptors like this:

Jrn.Command "DesignBar" ,
"Create a wall , ID_OBJECTS_WALL"
Jrn.Directive "JournalDataChainOption" , "Walls", 1
Jrn.MouseMove 0 , 503 , 368
Jrn.LButtonDown 1 , 503 , 368
Jrn.MouseMove 1 , 504 , 367
Jrn.LButtonUp 0 , 504 , 367
Jrn.MouseMove 0 , 936 , 371
Jrn.LButtonDown 1 , 936 , 371
Jrn.Data "Transaction Successful" , "Wall"

To the uninitiated, this looks like a lot of gobbly gook (perhaps à la The Matrix), but if we break it down, we can understand what is happening in Revit. First, the command initiated is the wall tool on the design bar: Jrn.Command "DesignBar" , "Create a wall , ID_OBJECTS_WALL"

Next are any options related to the wall command in this case the chain option is checked. Then, there is a mouse move, presumably to locate the cursor where we want to start drawing the wall, after that there is a Left Mouse button click at the same location to initiate the process of creating a wall, apparently the user's hand was slightly unsteady as there is a mouse move registered before the button is released up again. After that, there is another mouse move to the end point of the wall, then another click to complete the wall. We know that the creation of the wall, and therefore the end of this particular command was completed successfully as there is a "Transaction Successful" line with the key "Wall" to indicate the wall command finished.

Almost all other commands in a journal file follow a similar pattern, I usually try to start by looking for the transaction successful line and working backwards, but you don't have to, particularly if you learn to read the journal files.

Now you might find you journal files tend to look like this:

This is quite messy, but all the lines that start with an apostrophe ( ' ) are comments, also automatically recorded, however they have nothing to do with actual Revit commands, they may just serve to provide additional information, like memory statistics, or the date time code of when a command took place. It is actually possible to scrub a journal file of much of this additional information, but, while I know it can be done, I don't know the details of how it is done.

So you say, what am I to do? Well, you can use the find command (available in even lowly Notepad) to search for specific things. Since journal files are recorded in plain English so to speak generally searching for a keyword related to the command you are looking for is a good start. So a search for "window" will start to turn up any instances of interactions with the window command, or window objects.

If you want to learn more about journals, you might want to start by starting Revit, creating a blank file, then performing some simple actions, like creating a few walls, placing a door or two, make a section, etc. When you finish, close Revit, then go find the most recently created journal file. See if you can trace your actions through the file. You should be able to identify code for every specific command you take. I will warn you that when you switch views, or modify them, you get a ton of additional code that has to do with what the window is doing, you can generally ignore most of that, and keep tracing your commands.

In my next post we'll actually take a look at doing some useful detective work with the journal file, and a real life casefile that I have to share. We'll follow that up with something that I think a great number of people will find extremely useful, so stayed tuned, the season finale is around the corner...

Monday, October 27, 2008

What has been keeping me busy.....

So, I've recently (6+ months) been busy working on designing a house with my wife. Of course, we're using Revit, though I can't claim that we've done anything revolutionary. Our 2,800 sq ft house is a 60mb file.... I think I've modeled a little too much detail :). Enjoy some of the 2009 renderings.

Join me @ AU!


I will be attending AU yet again (my third time). I'm looking forward to a couple of things already. On Monday there is a "Design Computation Symposium" being hosted by Autodesk and the AEC solutions division it will be chaired by Robert Aish. This should be very interesting as Robert worked for Bentley helping to develop Generative Components, now he is working with Autodesk.

The other thing that I'm interested in is the AU Unconference. In its second year, last year was very well received, the sessions were open and allowed for great discussion among peers. You can vote for the sessions you think will be interesting here: Vote

For more info on Unplugged visit the website.

Monday, October 13, 2008

More phase issues (graphics)

Hello again,

Another issue I found while running the education session last week was dealing with the results of a new insert in an existing wall.

When you place something like a door into an existing wall object, lines for the door, show up in your existing floor plan views, and there is a quasi selectable "infill" object. I also do not remember seeing this behavior in previous versions of Revit.

Sunday, October 12, 2008

Inserts in Existing Walls

So I realize I've been lapse on my posting of late. Mostly because I haven't much I'm in a position to share. That said. I was recently running a week of education based on our new curriculum and we (the class and I) ran into a really odd error that we had not seen previously.

Specifically the class was focused on Phasing in Revit. We were going through how you can add a door to an existing wall. In our case, we had already deleted an existing door from the same wall object, and there was an infill portion of new wall where we had removed the door. As part of the class we had changed the wall type of the infill, and we had made it larger then the existing wall. When we placed a new door, the new door took on the dimensions of the new wall infill, and the existing wall was not cut.

With a little bit of playing around, we determined that the door was hosted to the new infill wall, and that by using the "Rehost command" in the options bar we were able to host the door properly to the existing wall. I will warn you that getting the door to rehost properly can be tricky. The behavior of hosting to the new infill seems to be consistent, as students saw the same behavior, and I was able to re-create it again too (admitedly all on the same project file). The training file was started in 2008, before being upgraded. None of remeber seeing this behavior previous to 2009. I do know that Autodesk has had some sample file(s) with this behavior, and they used it as a puzzler at AU2008, however in that case it was a plumbing fixture, not a door.

So, the short is, the behavior is not completely new, but I don't remember it being as prevalent previously. So take this as a word of caution.

Thursday, August 28, 2008

Plagiarism!

I wanted to draw everyone's attention to this important post on Steve's blog. No need to re-hash, but this is a pretty big deal. I haven't thoroughly checked to see if any of my stuff has been re-posted. Though I don't tend to write tutorials or such.

Read all about it!

Wednesday, August 06, 2008

Experienced Revit user looking for work.

No it is not me. 4 years of experience in Architecture, preparing to take
ARE tests. Looking for work in Philadelphia or suburbs. Has worked on master
planning, dormitories, student centers and classroom buildings, other
previous experience too. Familiar with all aspects of Revit including 2009.

Comments are moderated through me either contact me that way or by e-mail.
May (big may) consider relocation to Boston area.

-R

This email is intended for named recipients only.

Wednesday, June 11, 2008

export to IES - LFRT follow-up

While at the LFRT meeting I gave a presentation on our use of IES at Burt Hill, specifically I profiled this project. Phil Read raised an interesting question, he has long preached the use of thin basics walls to function as a simple "curtain wall" rather then dealing with the more complex curtain wall tool. However, in discussing how Revit data is ported from Revit to IES he asked how would his "fake" curtain walls be handled. Not knowing for sure, I've gone back and done a simple test. The unforunate answer is, that fake curtain walls don't work.


IES looks to internal properties of objects in Revit to determine if they are a "solid" or if they are transparent. So therefore it knows that a Revit curtain wall should let light through, and it knows that a window will too. However it expects that walls will be solid. The material that has been mapped to the wall does not matter in this case. As you can, once this simple model is brought into the IES dialog, we're left with only one opening that reveals the space volume.

Friday, June 06, 2008

Revit '09 --> Max '09 FBX whitepaper

Autodesk has posted a whitepaper that details the workflow from Revit to Max when using the new FBX format. Given the FBX format's ability to carry a great deal of the Revit meta data and materials information, I would not be suprised if Autodesk continues to expand and develop the use of this format with regards to Revit. I think that what we can in the '09 products is a great first step, but I hope there is more to come.

design visulization white papers: http://usa.autodesk.com/adsk/servlet/index?siteID=123112&id=10155245

AIA LFRT & MOI!

I've been quite for awhile. Been quite busy really. This week I had an opprotunity to attend the AIA LFRt (Large Firm RoundTable) BIM Implementer's meeting in Seattle. Since it was all the top "bimmers" from the large firms I got to catch up with a number of familiar faces and meet a few more. Phil Read was there, and I finally got to actually meet him! the BIMI group has met twice before in the last two years, and I thought that this meeting was the best so far. This year it seemed everyone had one or more (mostly more) projects under their collective belts as firms, so we had some really good dicussions about a number of topics, from training to content, and even wish lists. It is really quite useful to be able to have these discussions with people who are in similiar situations.

One of the presentations was by a one man software development company called "Triple Squid Software Design". He originally helped Rhino, and after being here and there, he is working on a new project called "Moment of Inspiration (MOI)" it is "sculptural design software, similiar in some ways to Sketch-Up, but also quite unique and different. He uses a couple of industry standard file formats, including Rhino, so it is compatible with other tools. He has only just recently released version one, but it looks really promising. The software is very tablet friendly, as it only uses left clicks, and very little keyboard interaction is required (unless you so choose). Check it out, there is a full 30 day demo, or an infite demo with no save capabilities.

go here for more: http://moi3d.com/

Sunday, May 18, 2008

Looking for a few good Philly models (for research)

Autodesk has contacted me to help find Revit models of buildings in Philadelphia that firms would be willing to contribute for research under NDA (Non-Disclosure Agreement) conditions.

This means that Autodesk would use the files internally, but that model data would not be released for public consumption. Specifically I've been contacted by Chris Andrews who is a project manager for the PSEB Geospatial Group. The project that he is working on is called "Digital Cities", and I believe that we may have seen a very early demo of what they're cooking up at the '07 AU opening session (needless to say I don't know many people with 360 degree wrap around screens ;) ).

If you have a model located within the city of Philadelphia that you would be willing to share you can contact Chris directly at: chrisdotandrewsatautodeskdotcom (replace dot & at respectively).

I honestly don't know much more then what I'm telling you here. I can tell you that we will be giving them 4 models of buildings we've worked on here in Philly, and some of them are pretty messy files. My thought is that real customer data for a project like this can only help Autodesk develop a better product. Some sort of full integrated Geospatial program that leverages BIM data could be hugely valuable, however as we all know, that is a great deal of data and information to transact.

One other note, Chris is also involved with Autocad Dev Camp, which I believe is an annual event. If you have any interest in programming, or custom tool development, or how to stretch what Autodesk programs are doing for you, then from what I hear, this is the place to be. Check it out here: http://usa.autodesk.com/adsk/servlet/index?id=11000493&siteID=123112

I would consider going this year, but my June schedule is already booked to the hilt! Fun times coming up on the west coast for AIA LFRT & AGC, nothing like jumping around between two major professional organizations. :)

Sunday, March 23, 2008

Comment Moderation

Hi all,

I've had to enable comment moderation as apparently I must have used some "key" words in my most recent posts. I've had several spam comments I've had to remove. Therefore with moderation enabled there may be some delay on comments appearing on the blog after you've posted.

Thanks,
-R

Wednesday, March 19, 2008

Dimensions, you're reporting what? More Revit '09

So....

As any good Revit user knows, its will nigh impossible to make a dimension lie. Sure you can adjust the rounding value, and you can make the text super small (and write your own), but there was never way to just make that dimension string report and out right lie.

Well......, you still can't.


However! We've been given the next best thing. We can now insert text to replace the string value. On top of that, you can add more then a prefix or suffix, you can actually put text above or below (that is attached to the dimension string). Now I admit that Mental Ray is cool, and there are some other nifty improvements in a variety of areas. But if you asked me, and there was one thing out of 2009 that I wanted to hold on to, well this would be pretty high on my list!


More after the pics (BTW, let me know if these are illegible...)


So you might look at these images and say, well in that text field, why can't I just type; 3' - 10". Well, because the developers have been extremely clever. They've coded that dialog box so well, that you can't fake it out. You can try every combination you can think of, and it just won't work (the rumor mill says they had fun testing this one in house). The only way to make it say; 3' 10" is to type "three foot ten inches", which somehow, I don't think is quite what we want. What is particlary nice is, if you're like me, you can insert "Varies" or when doing stairs/landings, you can easily include "clear" below, and or list rise/run strings, rather then (or in addition to) numerical values.

Now that Steve is making me look bad, I might have to start doing some videos too... That guy, always keeping me on my toes ;). Don't expect to hear my voice though, I settle for demonstrative & my typing.

Cheers,
-R

Saturday, March 08, 2008

Warning, Warning - Revit 2009

Another neat little new feature of 2009 that they've snuck in is some upgrades to the warning's dialog box. You can now export the Review Warnings dialog as an html file for review later, or as you address the warnings in your model. The other really neat new feature is the "Warning Button" that now becomes available in the Options Bar if you select an element that has a warning attached to it. In my simple example I've copy/pasted a wall on top of itself in the same place, resulting in a warning about walls overlapping, and how I should use the cut geometry tool, etc... When I select one of the walls, the new button pops up, clicking it results in the warning dialog appearing with the warning(s) specific to your selected element.


Thursday, March 06, 2008

Revit 2009 - new feature

So while most people will probably be really excited by the new rendering engine in Revit 2009 (congrats to the Factory BTW). There are lots of other small things that got added. One thing that I stumbled upon, which I don't recall being documented (yet), is a new control handle for wall's who have had their join condition dis-allowed. What is supposed to be particulary useful about this feature is that it is available on wall join conditions that previously we couldn't edit, for instance when you edit the profile of wall, or use the opening tool to create an opening. In either condition there are never any blue circle handles with which to manipulate the wall (makes sense right), thus you couldn't right click to disallow the join. Now, with the new feature you can disallow the join. What is particulary nice is the control becomes available on any wall normal wall end when you disallow the join. This helps to serve as a graphical reminder that a wall join has been dissallowed, when a user says "hey, why isn't this wall join working!"


See the images for more detail:


Thursday, February 14, 2008

2D CAD sucks

I've recently been forced to work on an Autocad project out of neccessity (lack of staff). I have to say that after spending 12 hours attempting to somehow remeber what I'm doing in Autocad, it just plain sucks. I really truly beleive that moving to a non object based Computer Tool like 2D CAD was one of the worst things our industry ever did. We should've stuck with pen & paper until a tool like Revit or Archicad or Tri-Forma came along. At least when we were drafting on paper (or whatever) a person really thought about what it was they were going to represent when that line was drawn, because no one wanted to redraw. With 2D CAD we got the notion of "oh its easy to change". Well yes, its easier to change, but working in 2D CAD has I think also fostered a notion of "we don't really think about what is going on" Now, this is not to say that people don't think when working in CAD, but I think you also can't deny that these ideas do potentially prevade our profession in some form or another, at different levels of intensity. I simply cannot beleive how painful it is to manipulate "stuff" in 2D CAD versus an object modeler like Revit. I am so frustrated by this, I simply want to run from my office screaming....

Sorry this isn't much of an informational post, but I'm somewhat frustrated..