Monday, February 23, 2009

RE: Link, The quest continues ....

Just a quick note about rendering with linked models.

In order for your linked model to render properly you need to :

A) make sure your model is linked to the current construction phase or your view is set to show complete. Otherwise everything in the linked model will render as grey.

B) Any custom material you create & assign to your geometry in the linked file needs to also be created in the file you are rendering from. They absolutely need to be called the same thing otherwise you get the following (unless you want to have red & black checker board wall finishes):


-K-

Thursday, February 12, 2009

Link & the quest for the princess


Ever get this message? The real problem? Well when you get this message it means that you have files that have been linked into that linked revit file that can no longer be loaded into the project. This reinforces my belief in limiting the number of cad files linked into a project to one or none. The solution to solve this message is simple: unlink or relink any & all cad files in the linked revit file.

-K-

Thursday, December 11, 2008

And now there are two: Part 1

In the beginning there was only Robert blogging. Now there are two.

Finally, after a long week at AU and pushing for a deadline as soon as I got back, I get to post my first post on this blog.

As some avid readers of this blog (and people I met at AU) already know Robert is my husband. So because most of you know his story let me first start off by telling you a little about myself.

I grew up in Albany, NY. I met Robert while attending RPI in Troy, NY. Came to work in Philadelphia, seeing as I wanted to actually live with my husband and he graduated first so I had no choice of location. I started working for a small 5 person residential firm in the area. After about a year I decided that I wanted to work on larger projects so I started working for Burt Hill with Robert. My first two weeks there I was thrown onto their first Revit project 2 weeks before CD’s were due. Talk about sink or swim strategy. :-) I fell in love with the program and have been an avid “evangelist” ever since. I now work for NELSON, a 500 person mostly interiors firm implementing Revit. Currently, we have two projects in Revit (well we’re back to one now that my deadline is over). The ongoing project is a 200,000 s.f. ground up project where we are doing the interiors only.

Now that I got that out of the way now on the more interesting topics: AU Unplugged. I really enjoyed my first speaking engagement at AU this year. It was a little nerve racking seeing as I’m not the best public speaker (thus why I’ve been staying out of the limelight thus far). But for some reason when I got that Unplugged email I felt compelled to submit.

It was really interesting to hear the debate about how much people model vs. don’t model. Some people were under the category of modeling everything save you time. Others were under the modeling everything makes the files too big. Both are very valid points. As far as me, I fall somewhere in between. If I’m going to cut a ton of sections through stuff or I’m going to render something, I tend to model it. But for other stuff, such as public bathrooms, nobody cares if they see the toilets in 3d. I mean unless you’ve designed some really hot looking bathroom, you’re not going to need to render it. By the way, I was on a project where we did end up rendering the bathrooms to show the client.

TO BE CONTINUED ....

-Krista-

Monday, December 01, 2008

Design Symposium (afternoon)


For those in the UK or designing for temperate climates, check out www.carbonbuzz.org. You can upload data anonymously, or let people know who you are, you can also benchmark against published standards. Either way, it helps you determine how you're doing on carbon use for a building. The trick is account for this type of information as you design (which is where the computation part comes in).

Earlier in the morning saw some interesting real examples of active facade elements designed by Hoberman Associates (Chuck Hoberman).

AU 2008 - Computational Design Symposium


So, Krista and I arrived yesterday. We're now attending the inaugural "Design Computation Symposium" hosted by Robert Aish. So far we have had a a fascinating presentation by Neil Katz of SOM, showing examples of 20 years of "Computational Design" work and application to a variety of scales from skyscrapers to interior "transparent" walls made of metal or corian.

After that we've seen some hints of what is coming in Revit Structure and Robot (Structural Anaylsis) to help Architects work with engineers to better understand how to derive efficient, elegant structures to support our building designs. By using analysis and permutation to understand various possibilities meeting different criteria.

Most recently we just saw a great "demo/review" of Ecotect by Dr. Andrew Marsh and the possibilities of scripting with Ecotect to generate "realtime" parametric anaylsis to understand the impact of passive sustianable design strategies on one's building design.

So far, an eventful and interesting morning, with more to come.

Monday, November 24, 2008

Andersen Windows

Anyone who has been around Revit for awhile knows that a long time ago Andersen Window and door came out with some families that impossibly complex and overbearing. So, since we're modeling/designing our own house, and we want Andersen Windows and Doors, I broke down and built some for myself. I've loaded them up on Revit city, you'll find single, double and triple casements & awnings (which share the same basic details). I followed the 200 series, but that generally matches the 400 series too. I did type catalogs for the casements. They all use a "core" casement or awning family that is shared nested. The cores are built with simple sweeps based on simplified Andersen details, so feel free to make more detailed if you desire. You'll also find simple interior and exterior trim that you can easily modify if you want. Find them here.

Happy Thanksgiving, and see you at AU!
-R

Wednesday, November 19, 2008

AU 2008 UnConference


If you follow the AU blog you know the UnConference Schedule has been released. This is the second annual UnConference at AU and for a second year in a row I will be running a session. You can also find out more information here.

My session this year is entitled: Size Doesn't Matter: A Discussion on Strategies for Complex Revit Projects Large and Small

So what would I like to see this discussion all about? In the last four years of working with Revit, I've come to realize that any number of conditions—such as multiple design firms, Integrated Project Delivery, multiple 3D models, phasing or early bid packages—can transform a straightforward design job into a knotty Revit problem. In that time I've discussed, observed and participated in several projects exploring a variety of techniques to address these issues.

This session is meant to be an active conversation by the attendees about their experiences and expertise. This will allow a broader and more detailed discussion of what works, what doesn’t, and when and where various strategies are appropriate. I'm expecting participants to use example project and conditions from their experiences to focus on Revit techniques, which may be influenced by hardware considerations but are fundamentally about selecting approaches when working in Revit. Be prepared to actively participate if you come.

My wife Krista will also be running her own UnConfernece session: Pros & Cons of 3D
Modeling vs. 2d Detailing in Revit

Hope to see you there.

Friday, November 14, 2008

A new favorite software & toy


Awhile back I bought myself a small little Bamboo tablet from Wacom. For those more familiar with the larger versions, this little $70 toy, is nice, it slips in my laptop bag effortlessly, and only requires a USB cable (no wall wart!). I can use it on my lap or at a desk without a problem.

The problem was, outside of Photoshop, I didn't have any good software to use it with, my laptop doesn't have TabletPC Edition on it, and most other programs (even sketch-up) are not really tablet friendly. You may recall I talked about Moi awhile back, adn while it is built for tablet use, I never have gotten into it, and I don't really need a modeling program like that at this time.

What I was originally hoping for when buying the tablet, was the ability to do some sketching, either on digital printouts (like PDF's), image files or freehand. Enter Autodesk, this summer they showed us a cheap little program called "Sketchbook Pro".

Sketchbok Pro is a nice little sketching program. Nothing fancy really, Autodesk says they benchmark against Photoshop as they develop Sketchbook. What is extremely nice is that its built for use with a tablet and stylus. The interface requires no right clicking and the gestures to manage the interface are tablet friendly. I've been using it primarily at the moment to work on our house, while we have a beautiful Revit model, it is often nice to sketch out ideas (check out the screenshot).

Monday, November 10, 2008

CSI Revit (Part III): Recreating a "crime"

We've discussed how to read journals, and how to use them to track down problems. Journals can also be used to recreate and create. Complex journal files built over a full working session perhaps don't work so well, but journal files created for specific purpose can be useful. For instance, Ken Stowe from Autodesk has in the past created journal files that can be used to sequence a Revit model using multiple phases to generate still frames of a Revit model being assembled. Journal files can be used to repeat tasks. Code can also be inserted into journal files to make changes or make things happen.

One useful thing you can do is insert code to create timers. Creating timers in a journal file allows us to test how long Revit takes to perform certain operations. So, we can create a journal file with specific tasks and operations that we plan to time. When creating a journal file to use for whatever purposes you need to be very specific about the tasks you do. In order to make it easier to read/edit the journal, excessive view manipulation, and "errors" should be avoided. Rather the specific tasks should carried out with the least possible mouse movement (shortcuts help). Once you've written your journal file, it is much easier to edit it if it has been cleaned (see the end of this post). When "writing" a journal file it is important that you always have the original file available that you start with, otherwise the journal will not run correctly. Another note, it is possible to save when creating a journal file, however when running the journal it must be able to exactly replicate the saving conditions. Writing journals with Workshared files also creates some difficulties, your best bet is to work with a detached copy, and not save.

With the clean journal file to create timers some basic code needs to be inserted at the beginning, after the line that contains "username":

Set fso = CreateObject("Scripting.FileSystemObject") 'create external file object
Set outf = fso.OpenTextFile("c:\My Temp\Journal Results\TimeResults.txt", 2, True) 'insert path for results file

Dim sTime,eTime,comment 'initialize variables

The first line starts the process, the second line "Set out f..." establishes where the results from the timers will be saved, and the last line "Dim..." sets the variables for the timers. After that, it is only a matter of actually creating the timers themselves.

Each timer is broke into a start and end. The end code looks like this (remember any line that starts with ( ' ) is a comment):

'stop timer code eTime = DateDiff("s", sTime, Time) 'put this at end of sequence to be timed. outf.WriteLine eTime & " Seconds of Elapsed Time for:" & comment 'end of code

I usually start with the end code, as you may recall it is easier to find "transaction complete" then the start. Once I have my end code in, I look for the start of the operation I want to time, and then I add the start code that looks like this:
'start timer code sTime = Time 'put this at start of sequence to be timed. comment = "Test Sequence Blah Blah" 'comment to specify what we are timing. 'stuff to time here

With the start code, its important to note that you need to add a comment to describe or name the timer where it says: comment = "Test Sequence Blah Blah"

A finished journal timer should look something like the image to the right.

Once you're code is inserted, you should be all set to run the journal. To run the journal, you will want to drag and drop the Journal file onto the Revit.exe icon located under ..\Program Files\Revit flavor\Program

At Burt Hill we've developed a utility that takes care of running journal files automatically, and repeatedly, so that we can gather multiple instances of results from the same machine running the same test. This allows for a better statistical comparison of machine performance from machine to machine, and makes it easier to run the same journal. We've also modified the code a little bit so that multiple results are appended to a single results file. With the code above, the results file is overwritten everytime the journal is run.

If you're interested, pop over to this AUGI thread. You'll find our benchmarker utility, and a couple of journal and revit files available for testing your machine(s). We've also tested using project files, however simply due to size, I can't release those. You'll also find a utility for cleaning the journal files, to make them easier to read.

Wednesday, November 05, 2008

CSI Revit (Part II): Tracking down the culprit

We left with how to read journal files, and a suggestion on practicing reading them. Today, we're going to talk about where and how they can come in use for some computer forensic detective work.

Allow me to set the scene.
  • At Burt Hill we encourage and keep multiple local files when working on a workshare project. This has come in use multiple times, and for multiple reasons. We usually suggest that a user maintain a week's worth, and sequentially overwrite the files.
  • A project team has been working diligently to their deadline. Annotating views, drawing details, setting up sheets, running check prints.
  • They're busy working the weekend, 12 hour days to meet their Monday evening print deadline.
Sometime late Sunday or Monday morning, someone realizes all the Keynotes are missing from all the views. The team knew they had been there as they had previous copies (digital & physical) of views/sheets that were complete.

The first step, was to figure out what could be done in the short term to deal with the problem. This is where our rule about multiple local files came in handy the first time. Team members were able to immediately start rescuing views by opening old local files and copying/pasting the missing Keynote Tags from old to current.

The next step was to figure out what happened to the Keynote tags, needless to user error was the primary suspect, but, whose error, and when? How many times have we all worked on large Revit projects, and had something "go missing" or something was "deleted" and we are left to wonder, what, who, when, how... Well one of our top users decided to track down what happened.

To start, he looked through the local files, local file history, and central file history to narrow down when the keynotes disappeared. For those who don't know, for both central and local files you can pull the save history from the File menu (see screenshot).

Once he had an idea of where to look more specifically is where the journal files became useful. With some sense of the approximate time to look for, our investigator used the find command to look for keynotes. What he eventually found was this in a journal file...

One of the users on the project had used "Select All Instances" of the keynote family used in the project, and hit "delete". For some reason this user was under the impression that "Select All Instances" was valid only for the active view! As it was, the user was helping our investigator, and was the one to find the four pages of text showing every keynote being selected, it was quite the teaching moment for the whole team.

While it took the lead investigator a good chunk of his day to sort through all the related files. It was needless to say quite useful to determine what had happened, most importantly, to help assure it doesn't happen again. While the copies of files, and back-ups helped with restoring the missing work, and helped to narrow down the time period in which the mistake happened, without the user's journal file there would have been no way to so clearly identify the culprit.

Check back at the end of this week (or beginning of next), for the my wrap up on journal files.

Sunday, November 02, 2008

CSI Revit (Part I): How to read the crime scene.

Do you know what a journal file is? If you have dealt with Autodesk support on an extended issue you may have been asked to submit journal files, but you may still not quite know what they are.

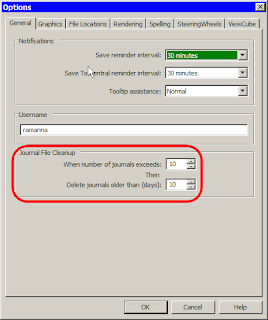
Quite simply journal files record all your actions during a Revit session, Revit creates a new journal file whenever you start it, and stops writing when you close it. Under the general tab of the options dialog [Settings menu >> Options] are two choices for how many and for how long you keep journal files. Revit always writes its journal files to the same location; Windows XP c:\Program Files\Revit version\Journals. I would assume that Vista installs maintain a similar structure/relationship. Journals are simple text files (in fact their extension is .txt) and can easily be opened with a program like "Notepad" (my preferred editor for such things). They are always named in the same format "journal.xxxx.txt", where the x's are four digit sequence.

Journal files are pretty interesting things, and can prove handy, particularly when troubleshooting. The reason Autodesk or Revit support likes to get their hands on journal files is because it gives them a window into what the user is/was doing, how the file is behaving, and how the computer is performing. Journal files not only record the user's interactions with the Revit file, but they also record vital computer statistics like how much memory is available, the video card installed, etc; all of which is useful when troubleshooting a problem.

The particularly nice thing about journal files is they can also be "read" by a human. While there is some esoteric code that shows up, it is actually generally possible to read a journal file and understand the actions a user is/was taking. Of course we're not talking about reading a good novel, but as you become more familiar with them, you start to understand the pattern of the language, and thus how to read it. Most commands are listed with simple descriptors like this:

Jrn.Command "DesignBar" ,
"Create a wall , ID_OBJECTS_WALL"
Jrn.Directive "JournalDataChainOption" , "Walls", 1
Jrn.MouseMove 0 , 503 , 368
Jrn.LButtonDown 1 , 503 , 368
Jrn.MouseMove 1 , 504 , 367
Jrn.LButtonUp 0 , 504 , 367
Jrn.MouseMove 0 , 936 , 371
Jrn.LButtonDown 1 , 936 , 371
Jrn.Data "Transaction Successful" , "Wall"

To the uninitiated, this looks like a lot of gobbly gook (perhaps à la The Matrix), but if we break it down, we can understand what is happening in Revit. First, the command initiated is the wall tool on the design bar: Jrn.Command "DesignBar" , "Create a wall , ID_OBJECTS_WALL"

Next are any options related to the wall command in this case the chain option is checked. Then, there is a mouse move, presumably to locate the cursor where we want to start drawing the wall, after that there is a Left Mouse button click at the same location to initiate the process of creating a wall, apparently the user's hand was slightly unsteady as there is a mouse move registered before the button is released up again. After that, there is another mouse move to the end point of the wall, then another click to complete the wall. We know that the creation of the wall, and therefore the end of this particular command was completed successfully as there is a "Transaction Successful" line with the key "Wall" to indicate the wall command finished.

Almost all other commands in a journal file follow a similar pattern, I usually try to start by looking for the transaction successful line and working backwards, but you don't have to, particularly if you learn to read the journal files.

Now you might find you journal files tend to look like this:
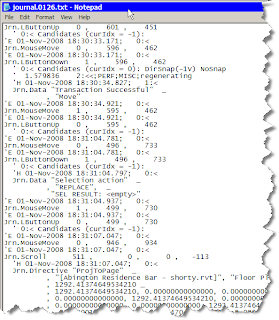
This is quite messy, but all the lines that start with an apostrophe ( ' ) are comments, also automatically recorded, however they have nothing to do with actual Revit commands, they may just serve to provide additional information, like memory statistics, or the date time code of when a command took place. It is actually possible to scrub a journal file of much of this additional information, but, while I know it can be done, I don't know the details of how it is done.

So you say, what am I to do? Well, you can use the find command (available in even lowly Notepad) to search for specific things. Since journal files are recorded in plain English so to speak generally searching for a keyword related to the command you are looking for is a good start. So a search for "window" will start to turn up any instances of interactions with the window command, or window objects.

If you want to learn more about journals, you might want to start by starting Revit, creating a blank file, then performing some simple actions, like creating a few walls, placing a door or two, make a section, etc. When you finish, close Revit, then go find the most recently created journal file. See if you can trace your actions through the file. You should be able to identify code for every specific command you take. I will warn you that when you switch views, or modify them, you get a ton of additional code that has to do with what the window is doing, you can generally ignore most of that, and keep tracing your commands.

In my next post we'll actually take a look at doing some useful detective work with the journal file, and a real life casefile that I have to share. We'll follow that up with something that I think a great number of people will find extremely useful, so stayed tuned, the season finale is around the corner...

Monday, October 27, 2008

What has been keeping me busy.....

So, I've recently (6+ months) been busy working on designing a house with my wife. Of course, we're using Revit, though I can't claim that we've done anything revolutionary. Our 2,800 sq ft house is a 60mb file.... I think I've modeled a little too much detail :). Enjoy some of the 2009 renderings.

Join me @ AU!


I will be attending AU yet again (my third time). I'm looking forward to a couple of things already. On Monday there is a "Design Computation Symposium" being hosted by Autodesk and the AEC solutions division it will be chaired by Robert Aish. This should be very interesting as Robert worked for Bentley helping to develop Generative Components, now he is working with Autodesk.

The other thing that I'm interested in is the AU Unconference. In its second year, last year was very well received, the sessions were open and allowed for great discussion among peers. You can vote for the sessions you think will be interesting here: Vote

For more info on Unplugged visit the website.

Monday, October 13, 2008

More phase issues (graphics)

Hello again,

Another issue I found while running the education session last week was dealing with the results of a new insert in an existing wall.

When you place something like a door into an existing wall object, lines for the door, show up in your existing floor plan views, and there is a quasi selectable "infill" object. I also do not remember seeing this behavior in previous versions of Revit.

Sunday, October 12, 2008

Inserts in Existing Walls

So I realize I've been lapse on my posting of late. Mostly because I haven't much I'm in a position to share. That said. I was recently running a week of education based on our new curriculum and we (the class and I) ran into a really odd error that we had not seen previously.

Specifically the class was focused on Phasing in Revit. We were going through how you can add a door to an existing wall. In our case, we had already deleted an existing door from the same wall object, and there was an infill portion of new wall where we had removed the door. As part of the class we had changed the wall type of the infill, and we had made it larger then the existing wall. When we placed a new door, the new door took on the dimensions of the new wall infill, and the existing wall was not cut.

With a little bit of playing around, we determined that the door was hosted to the new infill wall, and that by using the "Rehost command" in the options bar we were able to host the door properly to the existing wall. I will warn you that getting the door to rehost properly can be tricky. The behavior of hosting to the new infill seems to be consistent, as students saw the same behavior, and I was able to re-create it again too (admitedly all on the same project file). The training file was started in 2008, before being upgraded. None of remeber seeing this behavior previous to 2009. I do know that Autodesk has had some sample file(s) with this behavior, and they used it as a puzzler at AU2008, however in that case it was a plumbing fixture, not a door.

So, the short is, the behavior is not completely new, but I don't remember it being as prevalent previously. So take this as a word of caution.

Thursday, August 28, 2008

Plagiarism!

I wanted to draw everyone's attention to this important post on Steve's blog. No need to re-hash, but this is a pretty big deal. I haven't thoroughly checked to see if any of my stuff has been re-posted. Though I don't tend to write tutorials or such.

Read all about it!

Wednesday, August 06, 2008

Experienced Revit user looking for work.

No it is not me. 4 years of experience in Architecture, preparing to take
ARE tests. Looking for work in Philadelphia or suburbs. Has worked on master
planning, dormitories, student centers and classroom buildings, other
previous experience too. Familiar with all aspects of Revit including 2009.

Comments are moderated through me either contact me that way or by e-mail.
May (big may) consider relocation to Boston area.

-R

This email is intended for named recipients only.

Wednesday, June 11, 2008

export to IES - LFRT follow-up

While at the LFRT meeting I gave a presentation on our use of IES at Burt Hill, specifically I profiled this project. Phil Read raised an interesting question, he has long preached the use of thin basics walls to function as a simple "curtain wall" rather then dealing with the more complex curtain wall tool. However, in discussing how Revit data is ported from Revit to IES he asked how would his "fake" curtain walls be handled. Not knowing for sure, I've gone back and done a simple test. The unforunate answer is, that fake curtain walls don't work.


IES looks to internal properties of objects in Revit to determine if they are a "solid" or if they are transparent. So therefore it knows that a Revit curtain wall should let light through, and it knows that a window will too. However it expects that walls will be solid. The material that has been mapped to the wall does not matter in this case. As you can, once this simple model is brought into the IES dialog, we're left with only one opening that reveals the space volume.

Friday, June 06, 2008

Revit '09 --> Max '09 FBX whitepaper

Autodesk has posted a whitepaper that details the workflow from Revit to Max when using the new FBX format. Given the FBX format's ability to carry a great deal of the Revit meta data and materials information, I would not be suprised if Autodesk continues to expand and develop the use of this format with regards to Revit. I think that what we can in the '09 products is a great first step, but I hope there is more to come.

design visulization white papers: http://usa.autodesk.com/adsk/servlet/index?siteID=123112&id=10155245

AIA LFRT & MOI!

I've been quite for awhile. Been quite busy really. This week I had an opprotunity to attend the AIA LFRt (Large Firm RoundTable) BIM Implementer's meeting in Seattle. Since it was all the top "bimmers" from the large firms I got to catch up with a number of familiar faces and meet a few more. Phil Read was there, and I finally got to actually meet him! the BIMI group has met twice before in the last two years, and I thought that this meeting was the best so far. This year it seemed everyone had one or more (mostly more) projects under their collective belts as firms, so we had some really good dicussions about a number of topics, from training to content, and even wish lists. It is really quite useful to be able to have these discussions with people who are in similiar situations.

One of the presentations was by a one man software development company called "Triple Squid Software Design". He originally helped Rhino, and after being here and there, he is working on a new project called "Moment of Inspiration (MOI)" it is "sculptural design software, similiar in some ways to Sketch-Up, but also quite unique and different. He uses a couple of industry standard file formats, including Rhino, so it is compatible with other tools. He has only just recently released version one, but it looks really promising. The software is very tablet friendly, as it only uses left clicks, and very little keyboard interaction is required (unless you so choose). Check it out, there is a full 30 day demo, or an infite demo with no save capabilities.

go here for more: http://moi3d.com/