Monday, September 04, 2017

I've been working on the railroad....

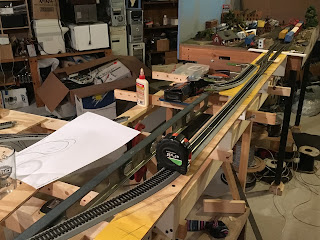
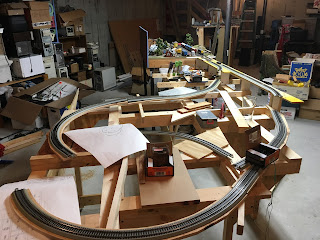
Not as much as I wish... Lots of things going in life, but in the last week+ I've found a few moments to put some time in. I was able to rig up some temporary wiring and thanks to the acquisition this summer got a DC locomotive up and running on temporary track. Lorenzo loved it. Sub-roadbed has been cut for the next sections and test fitted (as you'll see in the pics). The other big news was that new LED shop lights went up, you'll not the change in color temperature in the pictures ($15 @ Ocean State Job Lot, how can you not take that, even if they die in four years...).

The new sub-roadbed is 15/32" plywood, a bit more rigid which should be good for the curves. I ended up re-enforcing the thinner 3/8" plywood I used originally as I was not satisified it would stay flat. Some scrap pine and maple did the trick with some wood glue.

I also pre-drilled the hole pattern for the Tortoise Switch Machines from the top down, this should make installation much easier later as the holes are started and I don't have to mess with finding center-line over my head under the layout. I don't know if others use this approach, but it just makes sense! The sub-roadbed will be covered over (so who cares about a few holes), so as long as you can mark where the throw rod will be, you're good to go. I'm looking forward to a significantly easier switch machine install in the future. :-)

Lastly I've had to think some about electrical blocking as I will need a reversing section since I have a return loop. Currently it looks like my max train length will be ~6 1/2'. This should be ample given the size of the current layout and I can do thinks like put detection on cabooses with DCC decoders or resistors for signaling, automation and full train detection, etc. in the future.

Till next time; toot, toot!

New sub-roadbed test fit with track.

Reinforcement of sub-roadbed

pre-drilled holes for mounting switch machines underneath.


This straight-away leading into the reverse loop will be the auto-reverse power block.


Tuesday, July 25, 2017

Construction Delays, but expansion proceeds!

Two large sections of mainline.
So, good weather finally showed up which means construction has come to a stand-still (ironic for a railroad, right). Taking a page from the company I work for the Railroad has decided to expand further via M&A activity! That's right, our little railroad has doubled in size thanks to the acquisition of all track and properties belonging to a neighboring railroad.

The railroad had laid dormant for some time and there was some damage incurred on moving from its original locale to the the house, however the bones are solid and we're looking forward to integrating it into the current plan.

Small fuel dealer/rail customer.
We're most excited by the addition a medium size stub end staging yard as well as a small engine terminal featuring a small turntable (scratch-built no less).

Looking forward to getting the first loop of track laid and running, then figuring out how to integrate the new portions!


Engine terminal.

Staging Yard

Tuesday, May 30, 2017

Benchwork Up!

Progress in the last week has resulted in the first half of benchwork being stood up! Thanks to Revit I had a detailed cutting plan to work from, and my estimate of material (from a schedule) was spot on for linear feet. If only the carpenter were as good as the computer, one mistake in my manual optimization of cutting led to having to use some scrap pine I had for one last piece... :-(

Still need to add a few more gusset plates for lateral re-enforcement but in general its quite sturdy for being made out of 1x2s! Lorenzo was happy to walk on it like a balance beam (holding hands of course). My plywood triangular gusset plates are courtesy of a Canstruction project a few years ago. Knowing that I would be building a Model RR some day I had the foresight (and spare space in the basement) to save the scraps (of course being the one with the truck I also have all the original pieces after we took down the can sculptures :-) ).

Once the final bracing is in place I'll bolt the new benchwork to the existing module and I'll be ready to start laying out and cutting sub-roadbed. I'm cautiously optimistic that I'll have (limited) running trains by sometime in July, if not summer vacations and conferences will likely put further progress on hold until late summer... :-(.

Sunday, May 21, 2017

Four years!!! What happened?

Yep, the last post was in 2013.....

So what did happen; lots of things. Mostly I felt like I ran out of useful topics around Revit and/or the more interesting stuff couldn't be shared for various reasons.

More recently you can read my Design Technology focused thoughts as part of the Design Technology Summit blog posts here.

So what should I do with this blog; well there are other things in my life besides Revit (no way!!!).

Among them I've always had a passion for model railroads, and now that my nearly two year old son seems just as excited (I should add my 6.5 yr old daughter also likes trains, but that rascal.....) I'm diving back in!

So I'm moving forward with designing a model railroad, its a great hobby I might add for lots of people, whether you have a more artistic bent or engineering/electronics/design there is quite literally a little bit of everything!

That all said I'm getting out of my armchair of having read Model  Railroader for the past two decades and I'm actually going to do something about it! I've resurrected my old HO scale module and have planned a simple dog-bone track-plan around it.

The last couple of Christmases the kids received some cars and engines from Santa as well as a bunch of Bachman E-Z Track sectional pieces. Since that was a pretty big investment by Santa (and no its not me) I decided that while not my first choice, I might as well use the E-Z track as it would get me to "market" more quickly with not having to laydown roadbed, spike flex track, etc.

Now I wouldn't be a very good Design Technology guy if I didn't use software to do my planning... :-)

So I found what I think so far is a pretty neat little track planning tool that gets the job done SCARM; it even has a train simulator, so you could just live in the virtual world forever. While there are other software packages out there (that have been around since the 90's) I really like this one (did I mention its free?). Admittedly the "Simple" in the name is a bit too true for a BIM junky like me, but it gets the job done, and in the realm of track planning, it is BIM for track planning, as you can print out a parts list!

Of course, I also found a way to work Revit into the mix. I used that to design and plan the benchwork to support my wonderful track-plan. A little hi-jinx with images got the track plan into Revit at scale so that I could make sure things were lining up "close enough". I could also make sure it would fit properly in the basement thanks to having a Revit model of the house!


Of course I also used Revit to create a quick sheet with dimensions and a schedule. Thanks to a handy renumbering tool I could key each instance to the schedule.

The end result? After $100 at the big Orange Store, as of tonight three girders are nailed, glued and drying (ran out of clamps) and the west end of the track plan has been fitted and tested (the beauty of snap track).


With some luck I'll keep the updates coming. Stay on track!