This issue was reported to me by a fellow Revit user.
The user had created some door families that had a user named reference plane with the "is reference" property set to either strong or weak (he had already used Revit's pre-named reference planes). He used this reference plane to define the origin of the family, as well having a dimensional constraint to the reference plane. When he attempted to switch the family in a project with a similiar family he received constraint error messages causing the family(s) to fail.
This an edited response from Autodesk support:
The only stable references in the family instance are those produced by reference planes designated as named references (that is top, bottom, right, left, etc...). In the families that you created the reference used for alignment (and assigned to define the origin) is a weak reference in both families (referring to families submitted to Autodesk), so it's unstable, and the dimensional parameter fails when the family is replaced (via the type selector in a project).
They (Revit factory) have edited both families and set "Is Reference" of the Reference plane to "Right". Now the reference can be aligned and the instance can switch families.
To sum it all up, use the built in "is reference" names to define reference planes that will also define the origin for the family.
Hope you all find this helpful.
-R
Wednesday, January 24, 2007
Tuesday, January 16, 2007
A couple of thoughts on walls
We've had some questions come up regarding wall joins. As is typical I can't manage to recreate any actual problems, but I can illustrate some of our general reccomendations to deal with wall join problems.
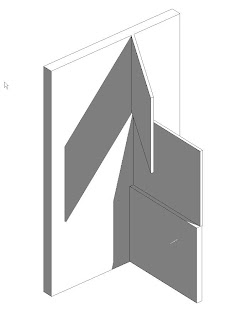
One of the biggest causes of wall heartache comes from wanting to construct our models in the way we think of our buildings (which makes sense when we're supposed to be virtually building the model). However, in conditions where we think of walls as being continuous vertically, we tend to create more problems for ourselves. Revit doesn't really like it when you have vertical walls that run across multiple levels & and multiple walls that go from level to level intersecting the continuous wall (see image to right).
Now, as I said at the beginning, I wasn't able to actually re-create any problems. However, in my experince I've seen similiar situations create problems with the wall join conditions. Revit gets confused about how it should be resolving the various join conidtions (especially if the walls have different materials and layers).
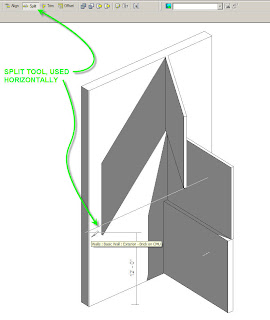
The easiest and quickest way to resolve this issue is to use the split command (thats right, it will work horizontally). I tend to find though that it works best in a 3D view. I usually like to split the wall approximatley where I need to seperate the wall, then I go back and make numerical adjustments in the properties of the wall "pieces". (See image below)
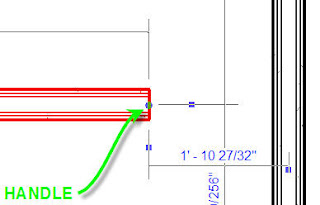
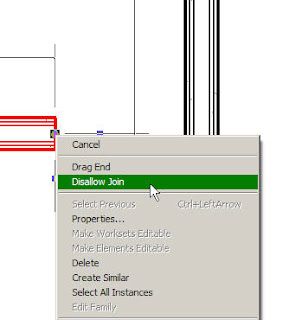
Another thing that is quite helpful (especially with curtain walls) is you can choose to dis-allow joins on specific wall's ends. When you select a wall you can right click on the blue handle at the end and you'll get a context specific menu. One of the options is to "disallow join" this will prevent Revit from attempting to automatically resolve the wall join conditions when two walls meet.
This is particularly helpful when dealing with curtain walls. Curtain wall join conditions can get particulary harry, especially when embedding curtain walls into basic walls, or working in corners.
However, when you do use the "dis-allow" join setting, graphically the walls won't clean up correctly. To fix this you can use the "join geometry" command from the tool bar. This command will force Revit to grapically clean-up the linework, however it won't effect the setting "dis-allow join". There is a difference between Revit's automatic resolution of wall geometry "wall joins" and the the effect(s) of the "join geometry" commnand. See the images below for the "dis-allow joing command. The image on the left shows the blue handle you need to right click on, the image on the right is the context menu.

One of the biggest causes of wall heartache comes from wanting to construct our models in the way we think of our buildings (which makes sense when we're supposed to be virtually building the model). However, in conditions where we think of walls as being continuous vertically, we tend to create more problems for ourselves. Revit doesn't really like it when you have vertical walls that run across multiple levels & and multiple walls that go from level to level intersecting the continuous wall (see image to right).
Now, as I said at the beginning, I wasn't able to actually re-create any problems. However, in my experince I've seen similiar situations create problems with the wall join conditions. Revit gets confused about how it should be resolving the various join conidtions (especially if the walls have different materials and layers).
The easiest and quickest way to resolve this issue is to use the split command (thats right, it will work horizontally). I tend to find though that it works best in a 3D view. I usually like to split the wall approximatley where I need to seperate the wall, then I go back and make numerical adjustments in the properties of the wall "pieces". (See image below)

Another thing that is quite helpful (especially with curtain walls) is you can choose to dis-allow joins on specific wall's ends. When you select a wall you can right click on the blue handle at the end and you'll get a context specific menu. One of the options is to "disallow join" this will prevent Revit from attempting to automatically resolve the wall join conditions when two walls meet.
This is particularly helpful when dealing with curtain walls. Curtain wall join conditions can get particulary harry, especially when embedding curtain walls into basic walls, or working in corners.
However, when you do use the "dis-allow" join setting, graphically the walls won't clean up correctly. To fix this you can use the "join geometry" command from the tool bar. This command will force Revit to grapically clean-up the linework, however it won't effect the setting "dis-allow join". There is a difference between Revit's automatic resolution of wall geometry "wall joins" and the the effect(s) of the "join geometry" commnand. See the images below for the "dis-allow joing command. The image on the left shows the blue handle you need to right click on, the image on the right is the context menu.


Subscribe to:
Posts (Atom)

